Quick picks
| Product | Key Specs |
|---|---|
| See price on Amazon |
|
| See price on Amazon |
|
| See price on Amazon |
|
Product availability, certifications, and retailer details can change; check the current Amazon page before buying.
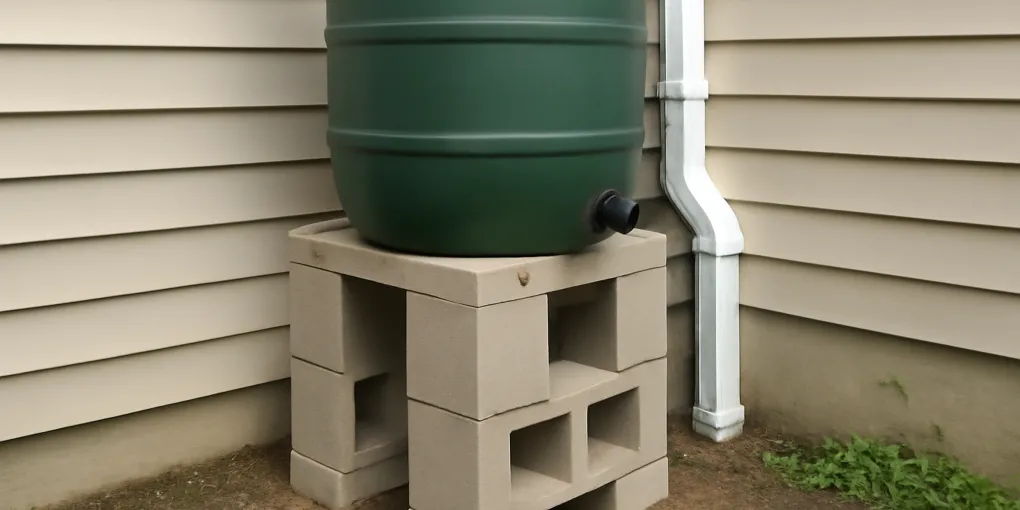
A full rain barrel is heavy. Water weighs about 8.34 pounds per gallon, so a 50-gallon barrel can put more than 400 pounds on its stand before you count the barrel, fittings, wet debris, or a child leaning on the rim. Raising the barrel can make watering cans easier to fill and can improve gravity-fed flow, but height only helps if the base is broad, level, and able to stay put after rain softens the ground.
The right stand height is not the tallest setup you can assemble. It is the lowest setup that clears your watering can, keeps the spigot usable, lets overflow leave safely, and does not turn the barrel into a top-heavy object beside a walkway or foundation. If you are still sizing the outlet and hose route, pair this guide with our rain barrel height and pressure guide and our overflow routing guide.
Quick stand picks
Use the structured picks above as starting points, then match the support to the site rather than the catalog photo:
- Search Amazon for rain barrel stand platforms when you want a purpose-built platform that matches a barrel footprint and keeps the spigot above a watering can.
- Search Amazon for solid concrete blocks when you can build a short, wide base on compacted soil or pavers.
- Search Amazon for outdoor paver base panels when the stand needs a flatter load-spreading layer over prepared ground.
Step 1: Start with the loaded weight, not the empty barrel
Before choosing a stand, estimate the filled weight. A 45- to 55-gallon residential barrel commonly carries 375 to 460 pounds of water alone. That load is concentrated over a small footprint, and it may sit there for days after a storm. A base that feels solid under an empty barrel can settle once the soil is saturated.
Look for three failure signs before you add height: soft mulch, loose gravel that shifts under foot, and soil sloping toward the house. If any of those are present, fix the ground first. Scrape away loose mulch, compact the soil, and add a broad paver or base layer that can spread the load. Do not set a tall barrel stand on stacked scraps of lumber, narrow bricks, or hollow blocks turned the wrong way.
Step 2: Choose the minimum useful height
Most homeowners raise a barrel for one of two reasons: to fit a watering can under the spigot or to get a little more gravity pressure for a hose. Those are different goals. A watering-can setup may need only enough clearance for the can opening plus your hand. A hose setup may benefit from more elevation, but the pressure gain is modest: each foot of water height adds roughly 0.43 psi.
For many backyard systems, a stand in the 12- to 24-inch range is more realistic than a tall tower. Going higher increases tipping consequences and makes inlet, diverter, and overflow alignment harder. If the barrel will feed drip irrigation, read the kit requirements before building the stand; some emitters and timers need more pressure than a single raised barrel can supply.
Step 3: Make the base wider than the barrel footprint
A stable stand supports the whole bottom of the barrel or the manufacturer-designated support points. The support should not press only on a narrow ring unless the barrel is designed for that. If you use blocks or pavers, build a platform wider than the barrel base, level it both front-to-back and side-to-side, and keep the top surface flat.
Avoid tall, skinny stacks. Two short layers spread over a broad footprint are safer than a column of blocks under the center. If you use a manufactured stand, verify the weight rating and check whether it is designed for your barrel shape. Some stands cradle a matching barrel but leave a different barrel unstable.
After the barrel is in place, fill it halfway and recheck level. A stand that shifts at half-full should be emptied and rebuilt before the next storm.
Step 4: Keep overflow and downspout alignment in the plan
Raising the barrel changes more than spigot height. The downspout diverter, inlet screen, overflow hose, and return-to-downspout path all need to line up with the new height. If the diverter is installed at the wrong elevation, it may keep sending water into a full barrel or fail to fill the barrel at all.
Leave room to clean the inlet screen without standing on the base. Keep overflow tubing visible during the first few storms so you can see whether water is soaking the stand or washing soil out from underneath it. If water leaves the overflow and runs back under the blocks, the stand may settle even when the barrel itself does not leak.
Step 5: Test before trusting the setup
Fill the barrel with a hose until it is heavy enough to reveal wobble, then gently test the spigot and hose without climbing on or pushing the barrel. Watch the stand, not just the water flow. Look for rocking, sinking corners, new gaps under blocks, or a barrel bottom that deforms because it is not evenly supported.
After the first heavy rain, repeat the check. The real test is a full barrel, wet ground, and active overflow. If the stand has moved, empty the barrel before rebuilding. Do not try to shim a full barrel.
How we score a rain barrel stand decision
| Criterion | Weight | How to apply it here |
|---|---|---|
| Research | 30% | Start with filled-water weight, manufacturer stand ratings, local frost/soil conditions, and the barrel footprint. |
| Evidence Quality | 25% | Trust level checks, half-full wobble tests, and post-storm settlement more than empty-barrel stability. |
| Value | 20% | Spend first on a broad, level base; extra height has limited pressure benefit if the stand becomes risky. |
| User Signals | 15% | Treat rocking, sinking, wet stand feet, or overflow erosion as reasons to lower or rebuild the setup. |
| Transparency | 10% | Make the support method easy to inspect so seasonal reassembly does not recreate a hidden weak point. |
FAQ
How high should a rain barrel stand be?
Use the lowest height that clears your watering can or hose connection and still keeps the barrel stable. Many residential setups work in the 12- to 24-inch range. Taller stands should be justified by a real flow need and built with a broad, rated support system.
Can I put a rain barrel on cinder blocks?
You can use masonry blocks only when the setup is broad, level, and supports the barrel correctly. Avoid narrow towers, unstable hollow orientations, and soft soil. Solid blocks or pavers over compacted ground are usually easier to make stable than loose stacked materials.
Does raising a rain barrel increase water pressure enough for sprinklers?
Usually not. Raising water one foot adds only about 0.43 psi. That can help gravity flow to a hose or low-pressure drip kit, but it is far below the pressure most lawn sprinklers expect.
Should the rain barrel stand sit against the house?
Leave enough clearance to inspect fittings, clean the inlet, and route overflow away from the foundation. A stand pushed tight against siding can hide leaks, wet soil, and overflow problems until the base has already shifted.
Sources
- U.S. EPA, Soak Up the Rain stormwater education: https://www.epa.gov/soakuptherain
- University of Minnesota Extension, rain gardens and residential runoff guidance: https://extension.umn.edu/landscape-design/rain-gardens
- Clemson Cooperative Extension, rainwater harvesting basics: https://hgic.clemson.edu/factsheet/rainwater-harvesting/
- Engineering Toolbox, water density reference: https://www.engineeringtoolbox.com/water-density-specific-weight-d_595.html