Quick picks
| Product | Key Specs |
|---|---|
| See price on Amazon |
|
| See price on Amazon |
|
| See price on Amazon |
|
Product availability, certifications, and retailer details can change; check the current Amazon page before buying.
A first-flush diverter is a small upgrade with a specific job: keep the dirtiest first roof rinse from becoming the first water in your rain barrel. It will not turn roof runoff into drinking water, and it will not fix a bad overflow route. What it can do is reduce the leaf grit, pollen film, dust, droppings, and shingle sediment that settle in the barrel after dry weather.
The right setup depends on roof exposure and maintenance access. A diverter mounted where you can open the drain, clear the screen, and see the discharge is far more useful than a large tube hidden behind the barrel. If you never clean the small drain hole, the chamber stays full and the next storm skips the first-flush step entirely.
This guide is for homeowners who already have a barrel, downspout, and overflow path. If your bigger problem is ordinary spillover, start with routing rain barrel overflow away from the foundation. If the barrel fills slowly, use our rain barrel slow-fill troubleshooting guide before adding more parts.
First-flush setup quick picks
- Search Amazon for rain barrel first-flush diverter kits if you want a ready-made tube, ball, fittings, and drain hardware matched to common downspouts.
- Search Amazon for downspout filter screens when leaves, seeds, or roof grit would otherwise pack the diverter chamber.
- Search Amazon for PVC cleanout cap fittings for DIY setups that need a serviceable bottom cap and drain.
Rutgers Cooperative Extension and Penn State Extension rain barrel guidance both stress screened openings, covered storage, cleaning, and overflow routing. CDC mosquito guidance also points to tight covers and removing standing water. A first-flush diverter fits into that maintenance system; it does not replace it.
Step 1: Decide whether your roof needs first-flush diversion
A first-flush diverter is most useful when the roof has long dry stretches between storms, nearby trees, heavy pollen, bird activity, asphalt shingle grit, or a downspout that carries visible dirty water at the start of rain. It is also helpful when the barrel feeds drip irrigation, a soaker hose, or a pump screen that clogs with fine debris.
You may not need one if the barrel is used only for ornamentals, the inlet screen stays clean, the barrel is easy to rinse, and roof runoff looks clear after normal storms. In that case, spend first on a tight lid, removable inlet screen, safe overflow hose, and stable stand. Those parts solve more common failures.
Do not buy a first-flush diverter as a health claim. It lowers some dirt load, but roof runoff is still roof runoff. Use collected water according to local guidance and avoid treating diverter water as safe for drinking.
Step 2: Pick a chamber size that you will maintain
First-flush sizing can get technical, but a practical backyard rule is simpler: capture enough first runoff to remove obvious roof dust without building a chamber so large that it is hard to mount, drain, or winterize. A small, reliable diverter cleaned every few storms beats a large tube that sits full of stagnant water.
Look at the roof section feeding the barrel, not the whole roof. A porch roof under trees may need more debris control than a larger clean metal roof. If one downspout drains a roof valley full of leaves, a screen before the diverter may matter more than adding chamber volume.
Ready-made kits usually list supported downspout sizes and chamber capacity. DIY PVC setups need a straight vertical section, a sealed bottom cleanout, and a drain that empties between storms. Leave enough room to remove the cap without moving the barrel.
Step 3: Put leaf screening before the dirty-water chamber
A first-flush diverter should catch dirty water, not become a leaf compost tube. Install a reachable downspout screen or strainer if your gutter sends leaves, seeds, needles, or twigs toward the barrel. The screen should have a visible cleanout and should fail safely through the downspout path instead of spraying water behind siding.
Search Amazon for downspout filter screens before rain barrel diverters
If you already have a barrel-top screen, keep it. The downspout screen protects the diverter, while the barrel screen catches anything that still makes it through. For tree-heavy roofs, two easy-clean stages are better than one fine mesh that clogs instantly.
Step 4: Mount the diverter where the drain can work
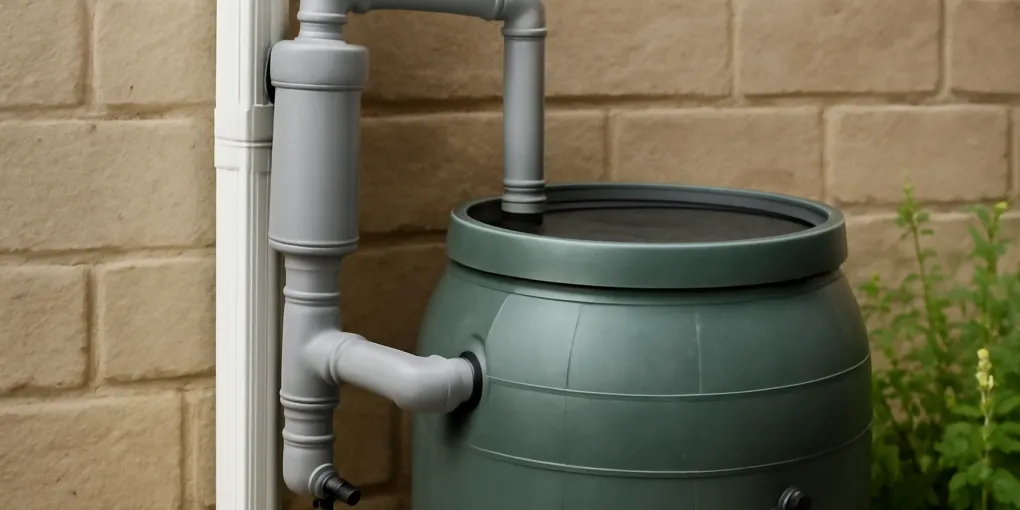
Most first-flush diverters use a vertical tube. The first runoff fills the tube, often lifting a floating ball or sealing point, then later water continues toward the barrel. The bottom drain slowly empties the dirty chamber after the storm. That drain is the part to obsess over.
The drain discharge should be visible and directed away from the foundation. Good locations include mulch, gravel, lawn, or a splash area that can handle a slow dirty drip. Bad locations include steps, deck boards, pavement that ices, basement walls, and hidden corners where mosquitoes can breed in a puddle.
Mount the tube plumb enough for the floating seal to work and high enough that the bottom cap can be removed. Avoid placing it where a full tube can pull the downspout loose or where a child, hose, or wheelbarrow will hit it.
Step 5: Connect the clean-water path to the barrel
After the diverter, water should flow smoothly into the barrel inlet, diverter hose, or screened lid opening. Keep the run short, sloped, and easy to inspect. A sagging hose after the first-flush chamber can hold dirty water and create a second sediment trap.
Check that the barrel still has a safe overflow path. A first-flush diverter controls only the beginning of a storm. Once the barrel is full, excess water still needs to leave through a hose, return-to-downspout diverter, splash block, rain garden, or other approved route. See our heavy-storm bypass guide if intense rain is the concern.
Step 6: Test it with a hose before the next storm
Do not wait for a thunderstorm to learn where the water goes. Run a hose into the downspout opening or test point and watch the sequence: water enters the first-flush chamber, the chamber fills, water begins moving to the barrel, and the drain later empties the dirty chamber. Look for leaks, side spray, backflow, and water aimed at the house.
After the test, open the cleanout cap. You should be able to remove grit without dismantling the entire barrel. If the cap is impossible to reach, adjust the layout before the system gets dirty.
Step 7: Add first-flush checks to normal barrel maintenance
Inspect the diverter after the first storm of the season, after pollen or seed drop, and after any storm that makes the barrel smell or fill with sediment. Clear the leaf screen, confirm the small drain hole is open, and check that the dirty-water chamber emptied before the next rain.
At shutdown, drain and remove the diverter if freezing weather can crack the tube or fittings. Store small washers, balls, caps, and screens together so spring startup does not become a missing-parts project. Pair this with our rain barrel winterizing guide.
Common setup mistakes
- Oversizing the chamber until it is too heavy or awkward to service.
- Letting the drain drip beside the foundation.
- Skipping the leaf screen on a tree-heavy downspout.
- Installing the tube where the cleanout cap cannot be removed.
- Forgetting that the barrel still needs overflow capacity after the first flush.
- Leaving a full vertical tube installed through freezing weather.
A first-flush diverter should make the barrel cleaner and easier to maintain. If it adds hidden clogs, hidden standing water, or a new discharge point beside the house, simplify the system.
Sources
- Rutgers Cooperative Extension: Rain Barrels: A Homeowner’s Guide
- Penn State Extension: Rain Barrels
- CDC: Mosquito prevention around standing water
First-flush diverter FAQ
Is first-flush water the same as overflow water?
No. First-flush water is the dirty early runoff you intentionally divert before collection. Overflow water is the excess after the barrel is full. They need different routes, but both should discharge where you can see them and away from the foundation.
Can I build a first-flush diverter from PVC?
Yes, if you use compatible fittings, a serviceable cleanout, and a drain that empties between storms. A kit is easier for many homeowners because the floating ball, seals, and drain washer are already matched.
Will a first-flush diverter stop barrel smell?
It can reduce some sediment and organic load, but smell usually also involves stagnant water, algae, decaying leaves, or a dirty barrel bottom. Clean the barrel, improve screening, and keep the lid tight.
Should edible gardens use first-flush water?
Do not use the diverted first-flush water on edible plant leaves. For collected barrel water, follow local extension guidance, keep runoff off harvestable plant surfaces when possible, and remember that roof runoff is not potable.
Frequently Asked Questions
- For home rain barrels, many owners start with a modest first rinse rather than trying to capture a precise lab-quality volume. Roof dirt, tree cover, bird activity, and barrel use matter more than a universal number.
- No. It can reduce some first-rinse debris, but roof runoff can still contain microbes, roofing residues, metals, and animal waste. Treat collected rain barrel water as non-potable unless it has a properly designed treatment system.
- Send it to mulch, lawn, gravel, or another visible area that drains away from the foundation and walkways. Do not let the dirty chamber drain onto steps, a deck, or a basement wall.
- Only if the manufacturer says so and the chamber can drain completely. Many vertical tubes and small drain fittings should be removed or opened before freezing weather.