Best Rain Barrel Overflow Diffusers and Splash Blocks for Safer Discharge
Buyer's GuideConcrete downspout splash block
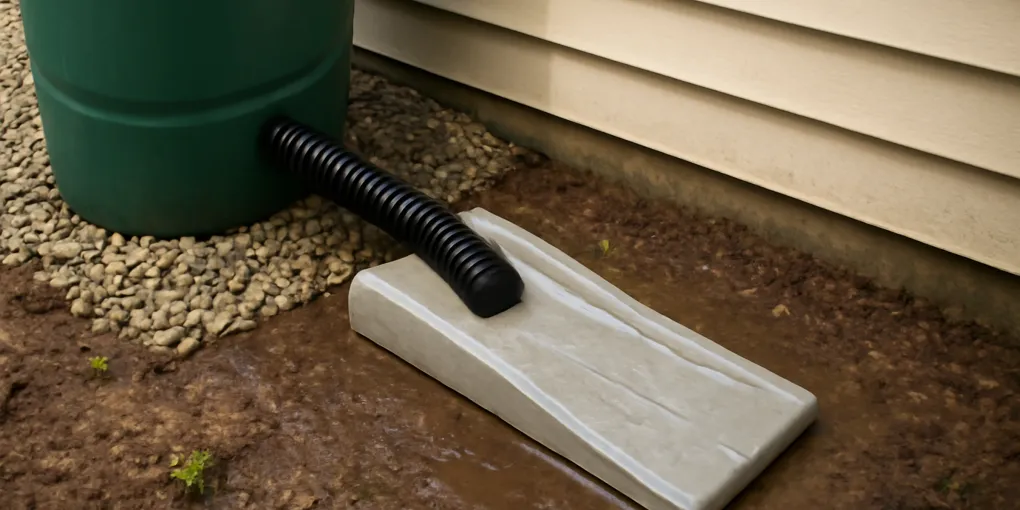
Best simple discharge padUse Case: Catching a short overflow hose at ground level
$12-$35 typical
Quick picks
| Product | Key Specs |
|---|---|
| See price on Amazon |
|
| See price on Amazon |
|
| See price on Amazon |
|
| See price on Amazon |
|
Product availability, certifications, and retailer details can change; check the current Amazon page before buying.
Rain barrel overflow is not a decorative afterthought. It is the part of the system that takes over when the barrel is full and the roof is still shedding water. A good diffuser or splash block slows that water, points it away from the house, and keeps a concentrated hose outlet from cutting a trench through mulch or soil.
The right choice depends less on how the part looks and more on the route water takes after it lands. During a storm, pour a bucket through the planned outlet and watch the first ten feet. If water curls back toward the foundation, pools against the stand, or crosses a walkway, the diffuser is not doing its job yet. Pair this guide with our foundation-safe overflow guide and heavy-storm bypass guide before the next big rain.
Quick picks for common overflow problems
- Short hose beside mulch: use a heavy concrete or recycled-rubber splash block and slope it away from the wall. Search Amazon for concrete splash blocks.
- Water still lands too close: add a flexible extension or longer overflow hose to reach lawn, gravel, or a rain garden edge. Search Amazon for flexible overflow extenders.
- Surface hose creates a trip hazard: consider a buried drain route with a pop-up emitter only if you can maintain slope and cleanouts. Search Amazon for pop-up emitter kits.
- Front-yard barrel needs a cleaner look: a shallow river-rock apron can spread small flows, but it still needs an escape path for heavy storms.
How to choose an overflow diffuser
Start with the water volume. A 50-gallon barrel can fill quickly under a large roof section. Once it is full, incoming roof runoff bypasses or overflows at nearly the same rate the gutter is feeding the barrel. That is why a tiny decorative tray can be fine for drips but inadequate for a cloudburst.
Next, look at the landing surface. Concrete, compacted clay, mulch, lawn, gravel, and planting beds all behave differently. A splash block on a flat patio may simply send water sideways. A hose ending in mulch may carve a rut. A gravel pad can work well if water can continue moving away instead of ponding under the barrel stand.
Finally, check the safe route. The best diffuser is the one that directs water away from siding, crawl-space vents, basement windows, and foot traffic. University extension rain barrel guidance commonly emphasizes mosquito control, stable placement, and safe overflow routing because captured water is only useful if excess water remains controlled.
Option 1: concrete or recycled splash block
A splash block is the simplest overflow diffuser. It gives the water a hard landing zone, spreads the initial hit, and points flow in one direction. For a rain barrel, use it where the overflow hose or bypass downspout exits only a short distance above grade.
Look for enough length to move water past the stand footprint and any soft soil at the wall. Weight helps keep the block from drifting during heavy flow. A recycled-rubber block can be easier to move than concrete, but it still needs a flat, stable base.
The key test is direction. Set the block so the low end points away from the foundation, then run a hose into the barrel until overflow starts. If water spills off the sides or runs underneath the block toward the house, regrade the base or choose a longer route.
Option 2: flexible extender hose
A flexible extender hose solves the most common splash-block failure: the discharge point is still too close. Corrugated extenders can route overflow around shrubs, past a window well, or toward a gravel strip without rebuilding the whole downspout.
Choose an extender that matches the expected flow and does not kink when bent. Short, gentle bends are better than tight zigzags. Keep the outlet visible if possible so you can confirm it is not clogged by leaves, mulch, or winter debris.
The tradeoff is housekeeping. A loose hose across a path is a trip hazard. Corrugations can hold sediment. Mowers and string trimmers can damage thin plastic. Use this option when the route is visible and easy to inspect.
Option 3: pop-up emitter or buried drain route
A pop-up emitter can make overflow cleaner in a narrow side yard, especially where surface hoses are ugly or unsafe. It is not a magic drain, though. The pipe from the barrel overflow or downspout bypass needs continuous fall to the outlet, and the outlet needs somewhere safe to discharge.
Build in maintenance access. A buried line that catches roof grit, leaves, or mosquito-screen debris should have a cleanout. In cold climates, trapped water can freeze. In flat yards, a pop-up emitter may stay wet and muddy after storms.
Use a buried route only when you can verify slope and local drainage rules. Do not send overflow toward a neighbor, sidewalk, septic area, or low spot that already floods.
Option 4: gravel apron or river-rock tray
A gravel apron or decorative river-rock tray can diffuse small to moderate overflow while blending into a garden edge. It works best when the barrel is already far enough from the foundation and the soil below the stone can drain or continue shedding water away.
Do not confuse decorative stone with capacity. A shallow tray can hide erosion at first, then undercut during a storm. Use landscape fabric carefully; fabric can reduce soil mixing but may also create a slick layer where water runs sideways.
If the outlet is visible from the street, this option can look better than a plastic trough. For heavy roof sections, combine it with a longer overflow path or emergency bypass.
Fit the diffuser to the barrel setup
A diverter-fed barrel often sends excess water back down the downspout when it is installed at the correct height. In that case, your diffuser may belong at the downspout outlet rather than the barrel. See our downspout diverter valve guide if you are not sure which path takes over when the barrel is full.
A direct-top-fill barrel usually needs an overflow hose from the barrel body. Put the hose outlet where you can see it. If the hose exits behind the barrel and disappears into weeds, you will not notice a clogged screen or hose until the next storm.
For raised barrels, remember that water falls with more energy. A hose ending two feet above mulch needs a harder landing zone than a hose laid on the ground.
Installation checklist before the first storm
- Fill the barrel with a hose until overflow begins.
- Watch the first ten feet of water movement, not just the diffuser.
- Confirm water never runs back under the stand or toward siding.
- Check for splash onto doors, vents, window wells, and walkways.
- Look for erosion after five minutes of steady flow.
- Add a longer extension, wider block, or different outlet if water still concentrates.
Do the test when the soil is already damp if possible. Dry soil can absorb the first few gallons and hide a routing problem that appears during a real storm.
Common mistakes to avoid
Do not aim overflow at the same soil that supports the barrel stand. Even a small rut can make pavers settle, tilt the barrel, and loosen fittings. Keep the discharge route separate from the load-bearing base whenever possible.
Do not hide the outlet so completely that you cannot inspect it. A buried route or decorative stone bed still needs a visible end point, cleanout, or seasonal check. Leaves, roof grit, and mulch can clog a small opening right when the barrel is already full.
Do not assume a pretty diffuser can compensate for bad grading. If the whole side yard slopes toward the foundation, a splash block may only slow the problem. Use the diffuser as one part of a route that has positive drainage away from the house.
Do not forget winter and shoulder-season storms. A hose that works in summer can freeze, crack, or sit under leaves. Before reconnecting in spring, repeat the hose-fill test from our spring startup checklist.
FAQ
Is a splash block enough for rain barrel overflow?
It can be enough only when the overflow exits far enough from the wall and the splash block slopes away from the building. If water still runs back toward the foundation, extend the hose or change the discharge point.
How far should rain barrel overflow discharge from the house?
Many homes need several feet of separation plus visible slope away from the foundation. Local drainage, soil, basement windows, and grading matter more than a single fixed number.
Can I connect rain barrel overflow to a buried drain?
Yes, if the pipe has continuous slope, a cleanable inlet, a safe outlet, and local drainage rules allow it. Avoid buried layouts that can back up into the barrel or downspout.
What is the best low-cost overflow diffuser?
A heavy splash block plus a short flexible extension is usually the lowest-cost starting point. Test it with a hose before trusting it in a storm.
Reader test: what to buy or do today
If your overflow hose ends near the house, buy a simple splash block or flexible extender first and run a hose-fill test today. If the outlet crosses a walkway, plan a safer route before the barrel is full. If you already have erosion, upgrade from a decorative stone patch to a diffuser that changes the discharge direction and distance.
The best rain barrel overflow diffuser is the one that passes a boring test: full barrel, steady inflow, water moving away from the house, no soil trench, no trip hazard, and no surprise pond beside the stand.
Sources
- Utah State University Extension, rain barrel placement and overflow basics: https://extension.usu.edu/waterquality/learnaboutsurfacewater/protectingwaterqualityathome/rainbarrels
- Penn State Extension, rain barrel setup and placement guidance: https://extension.psu.edu/rain-barrels
- U.S. EPA, stormwater runoff basics and homeowner practices: https://www.epa.gov/soakuptherain/soak-rain-rain-barrels